

In between my other projects I have slowly been making progress on The Veneration Cannons, so welcome back to part 2 of my step by step build.
Since last post I have done a lot of work cleaning up the gunners. The pants are now highlighted, the gloves, boots and rifle straps are black with grey highlights, and the faces have their base skin tone.


I have also started the rifles slung on their backs. The rifle bodies are meant to be black but with the highlighting they are starting to look a little grey. A wash should bring them darker again though.

Leaving these for a moment, I went to work on the bases. On all of my 60mm based models I like to get most of the base finished and then pin the men to the base. The main reason for this is that I use natural slate and I don't want to get paint onto it.
From other posts you may remember that I use brown-orange slate on my bases. I get this from my parents property in the Willunga hills. Their property sits between two neighbouring slate quarries but unfortunately for them, the slate on my parents property is too crumbly for quarrying. It is however, perfect for me!
Chunks of it look like this:

I brake it into smaller pieces and then gently split the slate into thin slithers. You can see the layers of the slate here.


I use a small screwdriver or an old razorblade to separate the layers and I collect any of the small chipped pieces in a box for later use .

Next I glue them onto the bases with super glue. I usually pre-paint the bases light tan but I forgot this time. The tan paint is just in case a small gap is left between my dirt and the slate.
First three bases:

Second three bases:

I use a mixture of brown dirt and sand for around the slate. I also collect this from my parents property (and yes, they think it is odd when I take a jar of dirt home after a visit).

Working in small areas at a time, I first put a dab of super glue and sped it with a tooth pick. Then I sprinkling a few small bits of slate, followed by the dirt/sand mixture. Finally, I sprinkle on some very fine ground up bits of slate onto the top. This last step adds the tiny tiny rocks that you can just make out. I find that this bit helps to add a sense of 'scale' the base.
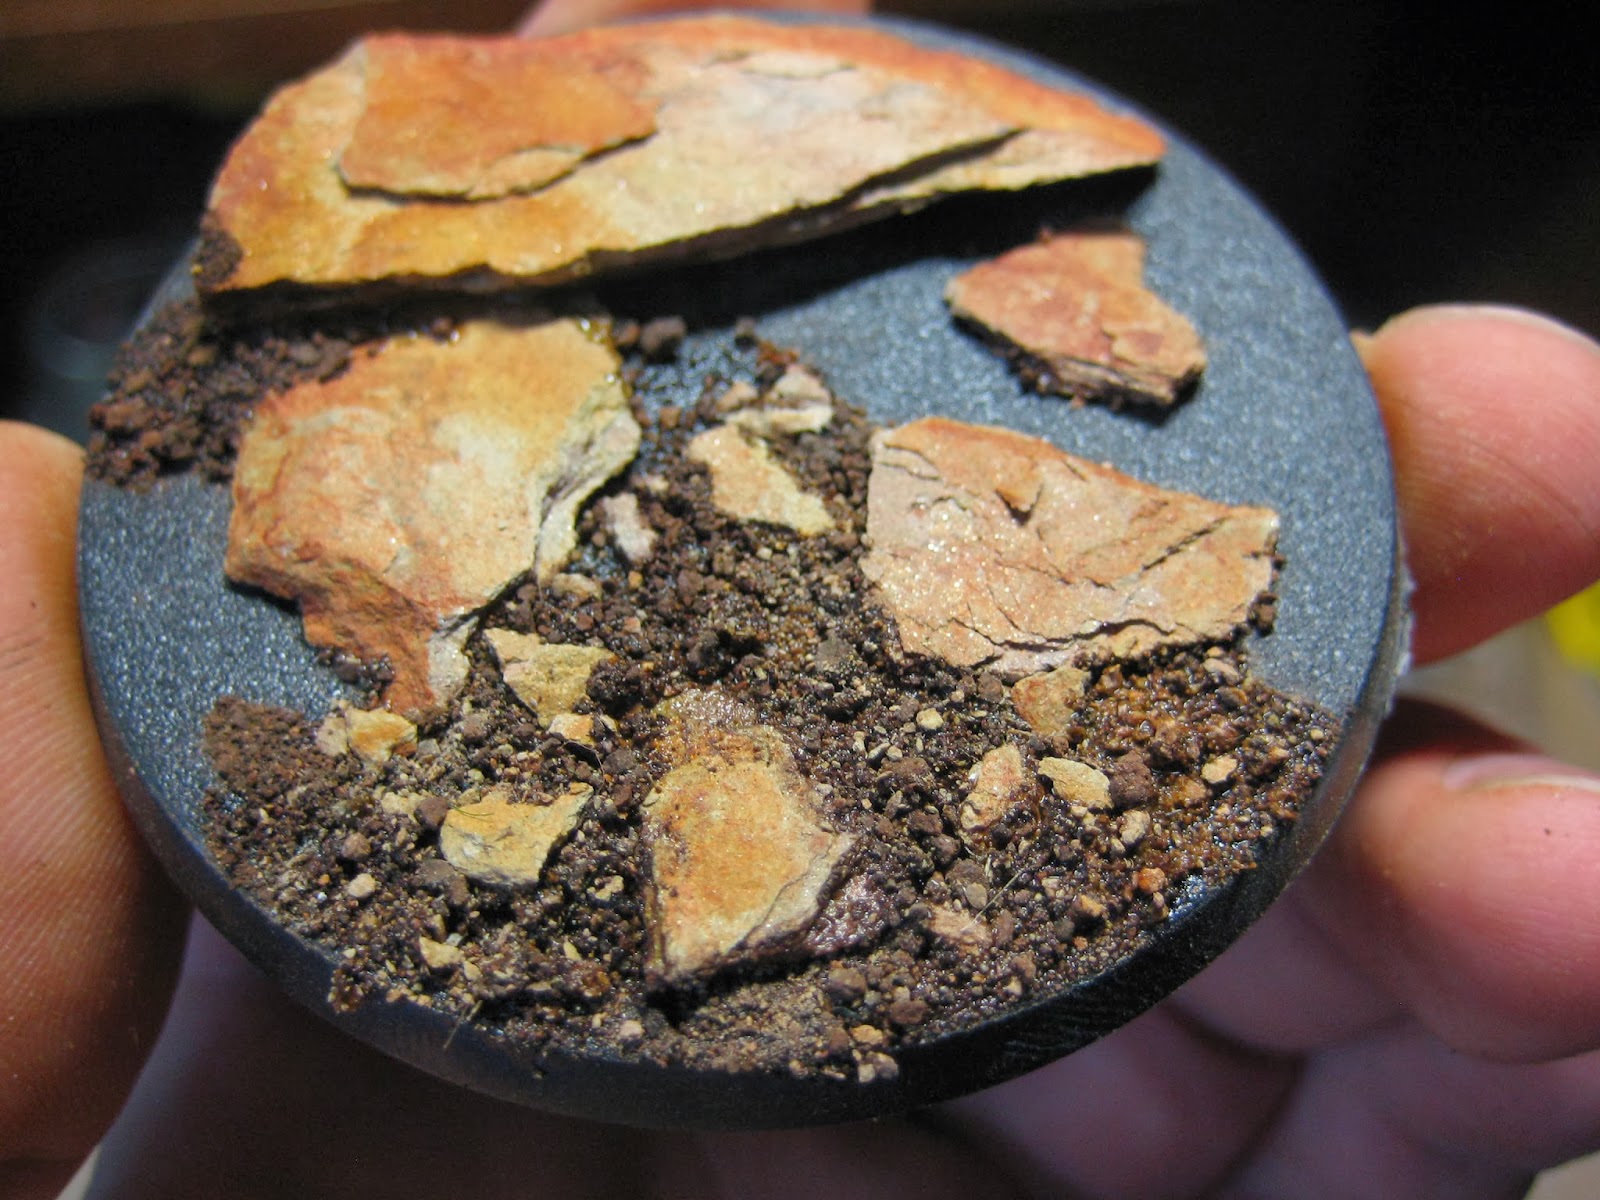


Here are the first three done:

And the second three:

On to the cannon carriages next! These were painted with two coats of Adeptus Battlegrey and then dry-brushed (generously) with Codex Grey.


I wanted to pin them to the bases next so I drilled 1mm holes in the wheels.

I positioned them onto the bases and marked the position of the pins. I like to use paperclips as the pins because they are easy to cut and bend.


These two holes fell on a bit of slate and in the dirt. If I drilled through this with my 1mm drill bit it would immediately blunt and break. So instead of a drill bit I use a small piece of copper rod. I squashed the end flat with a pair of pliers. It wears down pretty quick but it is easy to make.

Holes done:

And all glued into place:

If I am super keen sometimes I slap some Green Stuff around the pins after I trim them back.

With those all done I started the cannons. I painted the underside of them Brazen Brass and then worked up to the top with all the other GW golds - so the top was bright and the bottom was dull.

Here they are sitting in place. You'll also notice that I have painted the steel parts of the carriages silver (Boltgun Metal and Chainmail highlights):


So that's where I'm up to. I still need to finish the details on the cannons and add a wash. The gunners need their faces done and a tidy up of everything that is left. Then I will carefully cut off their basing tabs (on the bottom) and pin them in next to the cannons. I will probably inadvertently rub some paint off in the process and need to do some final touch ups but it will be way easier then painting them in place. Lastly I will add a few tufts of grass and repaint the rim of the bases black. Their background 'fluff' is on its way, so hopefully the next time you see these they will be done!
Comments are always welcome and feel free to vote (on the top left) on what projects you would like to see me get to next. With so many things on the go I'm not sure where to go from here!
Loving the care you take with the bases (mine are show jumping arena sand from the local country show field where I used to take my friends), they look great.
ReplyDeleteLooking forward to seeing the next instalment.
Those bases are lovely. The slate colours really are great. (My sand came from Bodega Bay last time we drove out there. :) )
ReplyDeleteYour idea for drill bit is also very clever.
This is going to be a striking unit once finished sir.
Great pictures, lovely to see the whole project evolving. Can't wait to see the finished article.
ReplyDeleteAbsolutely lovely! Those bases are amazing, and the guns look fantastic on 'em - Keep up the great work, man!
ReplyDeleteShaping up to be a really nice unit, and those bases are really very nice.
ReplyDeleteSo often when people use natural materials the scale looks off, but these are bang on.
Thanks for all the comments and praise guys. I always feel like it’s cheating not painting the bases, but it isn’t like just throwing on some dirt and rocks is an instant win either. I have been really trying hard to make the bases look more ‘real’ lately, so the positive comments are very heartening. I can’t wait to get the tufts of grass on them. You really get to have a lot more fun modelling a 60mm base over just the little 1inch guys.
ReplyDeleteThanks all for keeping my hobby mojo flowing!
Wow - this is genius!
ReplyDeleteLots of slate round here, but I've never managed to make it look any good - this really is a masterclass in how to do it well. Smashing!
I don't know about a 'masterclass', maybe a 'proficient-class'? But thanks Drax :)
DeleteThese are bloody lovely (understatement), they really look the part - superb work as ever. Those bases are absolutely outstanding, and I love the step by step. I use real Welsh slate for my Welsh minis, just feels like it adds that little bit extra. Keep up the good work sir!
ReplyDeleteThanks Kieran, It would be nice to be able to finish these up and move off the work bench.... I'll get there slowly.
Delete